Continuous integration with GitLab
Continuous integration is the practice of automating the integration of code changes from multiple contributors into a single software project.
- altassian.com
Role of Docker in CI
Docker or containers, in general, play an integral role in a CI pipeline and also for continuous deployment. Usage of docker stabilizes the CI procedure by performing the different stages and jobs in a desired pure environment rather than a highly heterogenous OS environment.
Also once the CI pipeline pass - which means successful building and testing, the Docker image contains the stable application which can be shipped to a container registry or deployed in remote systems for immediate use.
CI workflow with GitLab
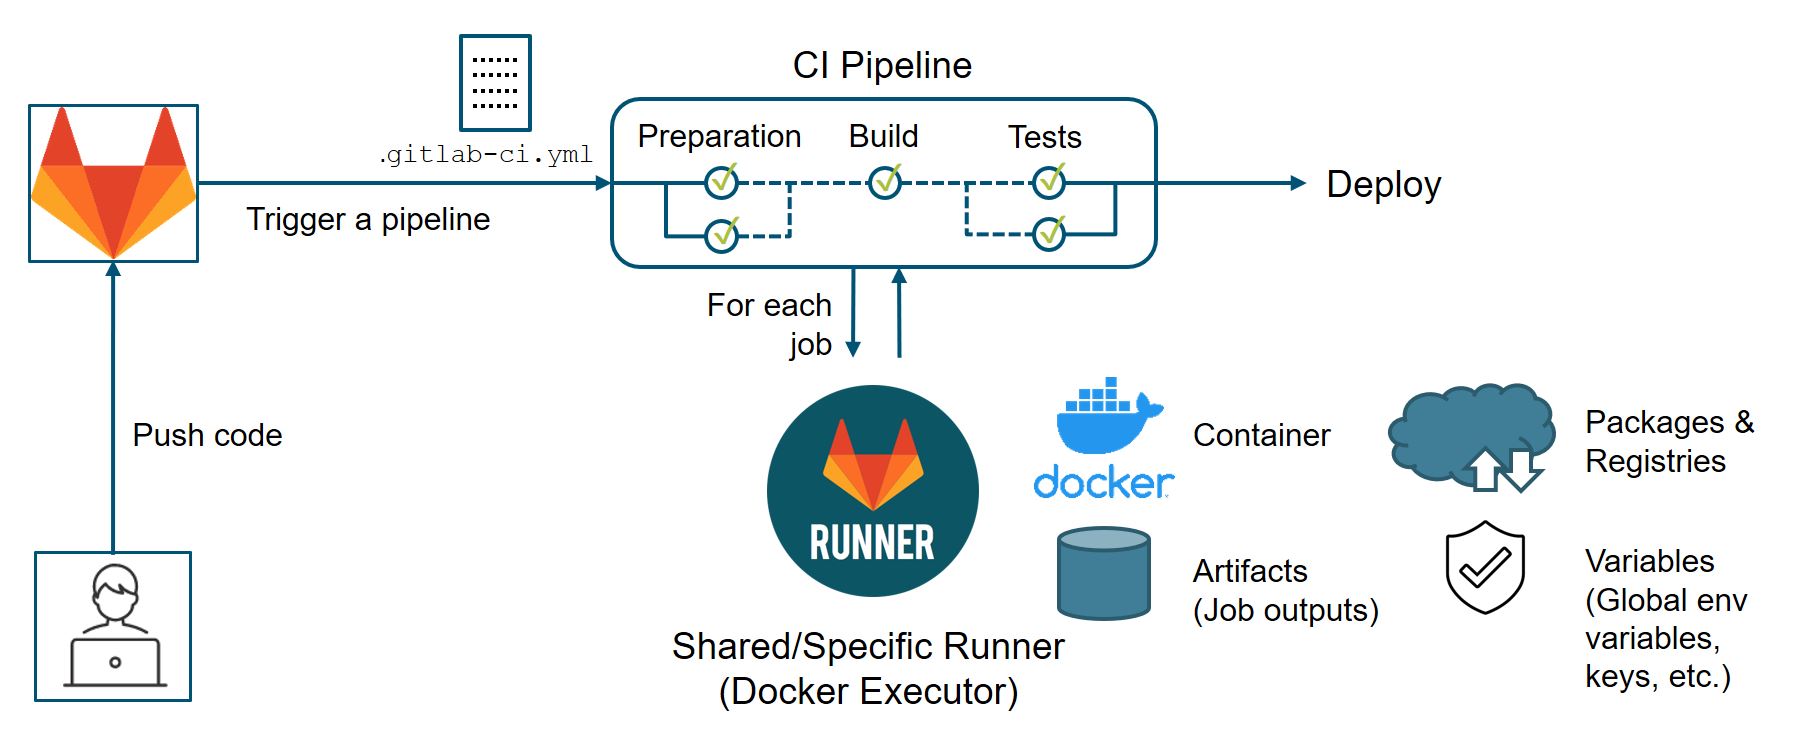
How to configure a CI pipeline?
The CI pipeline is configured within the .gitlab-ci.yml file placed at the root directory of your git project. A typical .gitlab-ci.yml file with configuration for software building and testing would look like this:
stages:
  - build
  - test

build-code-job:
  stage: build
  script:
    - echo "Here, follows some building scripts"

test-unit-job:
  stage: test
  script:
    - echo "Here, follows some unit testing scripts"

test-acceptance-job:
  stage: test
  script:
    - echo "Here, follows some acceptance testing scripts"
For advanced configurations, refer to https://docs.gitlab.com/ee/ci/yaml/gitlab_ci_yaml.html.
GitLab Runners
A runner is responsible to run the jobs in a pipeline. These are applications which are running on an infrastructure that is provided by an organisation, group or by your own.
In GitLab, you can see the available runners in your project by navigating to your Project page > CI/CD > Runners. Shared runners are machines available for everyone using the same GitLab instance. Whereas, specific runners are machines which can be configured by you. For instance, if you are particular about your code’s security, you may configure a runner which is running on your local machine. GitLab Runner installation instructions can be referred to https://docs.gitlab.com/runner/register/.
For the current workshop, we use a shared runner provided by the GITZ, TU Braunschweig.
Collecting artifacts
Job artifacts are files or directories which are generated when a job is executed. These artifacts can be managed and made available through the GitLab API using artifacts keyword in .gitlab-ci.yml script. For instance in the job unit-tests, one can upload the generated html test report with script:
unit-tests:
  stage: tests
  image: git.rz.tu-bs.de:4567/hk.sreekumar/ws-ci-matrix-calculator-test-project/ubuntu-image
  script:
    - python3 -m paver unit_tests
  artifacts:
    name: reports_unittest
    when: always
    paths:
      - report_unit_tests.html
More details on CI artifacts can be referred to https://docs.gitlab.com/ee/ci/pipelines/job_artifacts.html.
Collecting test coverage
GitLab CI uses regular expressions to collect test coverage metric from the job outputs. For instance, pytest can output the test coverage in format:
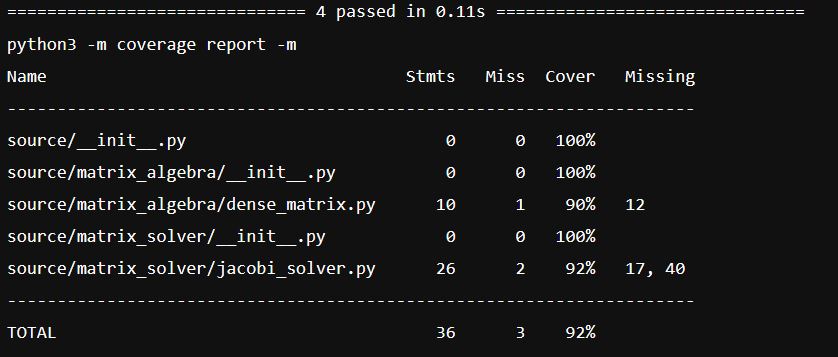
The following CI script with regular expression can be used to read the coverage value of 92%:
unit-tests:
  stage: tests
  image: git.rz.tu-bs.de:4567/hk.sreekumar/ws-ci-matrix-calculator-test-project/ubuntu-image
  script:
    - python3 -m paver unit_tests
  coverage: '/(?i)total.*? (100(?:\.0+)?\%|[1-9]?\d(?:\.\d+)?\%)$/'
More about test coverage visualization can be referred to https://docs.gitlab.com/ee/ci/testing/test_coverage_visualization.html.
The test coverage collected with the coverage keyword using a suitable regular expression can be showcased using GitLab Badges. Follow the steps below to create a coverage badge:
- In Gitlab project page, Settings > General > Badges
- Fill the fields with the following arguments:
Name: coverage
Link: https://git.rz.tu-bs.de/%{project_path}
Badge image URL: https://git.rz.tu-bs.de/%{project_path}/badges/%{default_branch}/coverage.svg - Click on
Add badge
Running jobs in HPC
Computationally expensive executions are common in the field of research. Running such tasks in a CI pipeline, therefore, requires the usage of high-end machines like HPC clusters. Such connections can be configured in a CI environment with tools such as HPC-Rocket or Jacamar CI.
Hands-on exercise
During the hands-on session, we demonstrate with a light weight python image (best practice). However, you created your own image with ubuntu as the base image during the Hands-on exercise in the Containerization chapter. Now, we recommend you to use this image for the following tasks:
- Create a CI pipeline by scripting a
.gitlab-ci.ymlrunning and testing your code project using the image you built. - Write scripts to collect an artifact
<PROJECT_DIR>/data/result.matgenerated during the jobacceptance-testsof your pipeline. - Write scripts to collect code-coverage from the
unit-testsandacceptance-testsand import it to your GitLab CI.