Command Line
General introduction
Visual Studio Code is a minimized version of Visual Studio is a Microsoft software that offers extensive coding abilities as well as different tools support such as Git (Version Control), PowerShell (Microsoft official task automation tool) and many more!
In addition to the tools mentioned above VS Code offers a substantial programming languages support from C#, Python, Dockerfile to Markdown and HTML.
Why Visual Studio Code?
All of these powerful features backed by immense number of extensions that can be installed from (Microsoft Marketplace) provide a great support for the development as well as version control.
Possible software solutions
There are different Version Control tools that can be used, mostly are command line based which the user enters the commands as text without GUI (Graphical User Interface).
| Tool | GUI Based | Environment | Download Link |
|---|---|---|---|
| Microsoft PowerShell / Command Prompt | No | Microsoft Windows | Built-in |
| Visual Studio Code | Yes | Microsoft Windows, Ubuntu, macOS, … | Download Link |
| Tortoise Git | Yes | Microsoft Windows | Download Link |
| *NIX Bash | No | NIX Based Systems | Built-in |
| Anaconda Prompt | No | Microsoft Windows, Ubuntu, macOS | Download Link |
| Git Bash | No | Microsoft Windows, macOS | Download Link |
Setup in VS
-
After installing Git on your local computer, the next thing to do is enabling it on VS Code:
-
Go to File → Preferences → Settings → Extensions → git
-
Look for the
git: enabledcheckbox and check it -
Now you have git enabled inside VS Code
Create a new project
-
You can create a new project in multiple ways:
-
One of the ways is you create a project within your existing repository and clone it to your computer and use it as a local repository, this way all the git dependencies will come along when you clone the repository from the website.
-
The other way is to initialize a repository, this can be done in a few steps:
-
open your preferred command prompt and change directory to the folder that you would like to initialize the repository in.
-
use command
git initand all of the git dependencies will be created inside a .git folder (If you cannot see it, it’s probably hidden!) -
create a test file such as a .txt file and name it, after that use command
git add --all, this command adds the data to local repository. -
after adding the files you need to (synchronize) your local repository with your remote repository this can be done by preparing the data for upload using
git commit -m NameOfYourFile.txtwhich prepares the data to be uploaded, the -m stands for message. -
the final step is to upload/push the changes that you have made to your repository, this can be made by using
git pushwhich grabs the data you have added into your local repository and pushes it the the remote repository. -
Open your preferred command prompt and change directory to the folder that you would like to initialize the repository in.
-
Use command
git initand all the git dependencies will be created inside a .git folder (If you cannot see it, it’s probably hidden!) -
Create a test file such as a .txt file and name it, after that use command
git add --all, this command adds the data to local repository. -
After adding the files you need to (synchronize) your local repository with your remote repository this can be done by preparing the data for upload using
git commit -m NameOfYourFile.txtwhich prepares the data to be uploaded, the -m stands for message. -
The final step is to upload/push the changes that you have made to your repository, this can be made by using
git pushwhich grabs the data you have added into your local repository and pushes it the remote repository.
-
Don’t forget to add a meaningful commit message, especially if you are working on a shared repository
Clone/Pull from an existing project
You can interact with the repository that you created either remotely inside the GitLab environment (Webpage) or locally in your computer.
- By now you have you should have your own GitLab repository, the next step is to clone it to your machine, so you can edit it more freely with a lot more functions can be done further.
- If you press
 in the GitLab webpage, you will be able to clone your current repository.
 - Before you can clone your repository you need to specify a method for GitLab to be able to verify and authenticate your machine, and you would be able to execute all the functions seamlessly without GitLab asking for permission every time you push or pull.
- The two authentication methods used by GitLab are:
- SSH: Stands for Secure Shell which is recommended as it is more secure.
To enable SSH, please follow these steps:
- Go to your profile icon in the GitLab website and press the dropdown arrow.
- Go to preferences and then choose
SSH Keysyou will see something like this: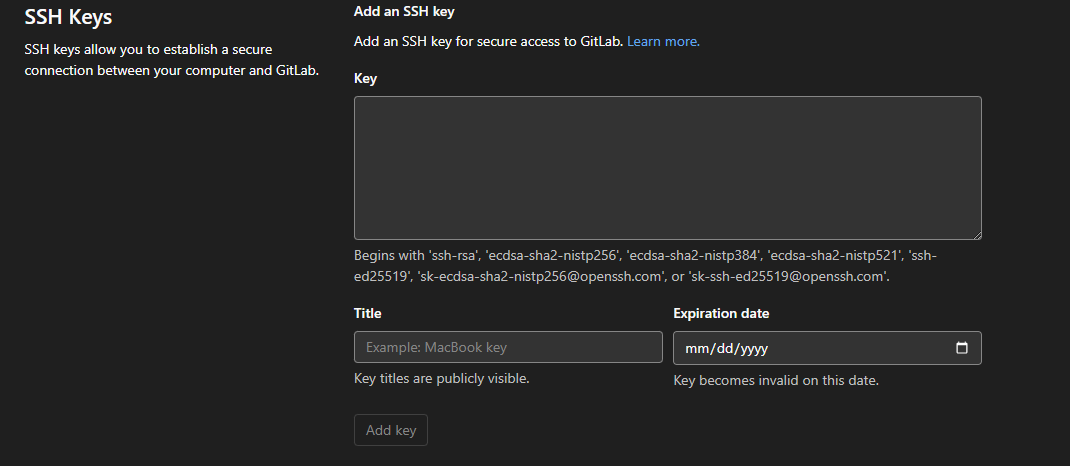
- Before you can add a key first you need to generate on by:
- Go to windows command line or any other shell and type
ssh-keygen - First you have to choose a directory to save your Public/Private key pair on your machine
- You need only the
id_rsa.pubfile which is the public key. Open the file with a text editor and copy the content of the file and paste it into the GitLab. - If you leave the expiry date empty, the expiry of the ssh key token will be set to never
- Now you can execute all GitLab functions securely and without having to enter your credentials every time you synchronize with GitLab.
- Go to windows command line or any other shell and type
- HTTPS : is more for private repositories and it less secure, so we will not further explain it.
- SSH: Stands for Secure Shell which is recommended as it is more secure.
To enable SSH, please follow these steps:
Editing files
Editing files in Visual Studio Code is straight forward, as you change the data inside a file in your repository and save VS Code will automatically detect change and will notification indicating that change has occurred, and you can stage it then push to your repository.
Stage, Commit and Push your project
Staging
Staging your data before committing lets you choose which data you would like to commit first (Saving data to your local repository) in order to avoid the same commit message to different work on different files.
If you change text in a file and add commit message that says (adding text), the same commit message will be applied if you stage another edit with the same file that you previously changed its text
Committing
As mentioned before committing is saving the data you have changed (edited, added, deleted) to your local repository, this is done in your computer.
Pushing
Pushing is the process of uploading the change you have made in your local repository to the remote repository (Your GitLab or shared GitLab)